Volume-based vs Ephemeral-based Storage for Kubernetes Clusters on EO-Lab OpenStack Magnum
Containers in Kubernetes store files on-disk and if the container crashes, the data will be lost. A new container can replace the old one but the data will not survive. Another problem that appears is when containers running in a pod need to share files.
That is why Kubernetes has another type of file storage, called volumes. They can be either persistent or ephemeral, as measured against the lifetime of a pod:
Ephemeral volumes are deleted when the pod is deleted, while
Persistent volumes continue to exist even if the pod it is attached to does not exist any more.
The concept of volumes was first popularized by Docker, where it was a directory on disk, or within a container. In EO-Lab OpenStack hosting, the default docker storage is configured to use ephemeral disk of the instance. This can be changed by specifying docker volume size during cluster creation, symbolically like this (see below for the full command to generate a new cluster using –docker-volume-size):
openstack coe cluster create --docker-volume-size 50
This means that a persistent volume of 50 GB will be created and attached to the pod. Using –docker-volume-size is a way to both reserve the space and declare that the storage will be persistent.
What We Are Going To Cover
How to create a cluster when –docker-volume-size is used
How to create a pod manifest with emptyDir as volume
How to create a pod with that manifest
How to execute bash commands in the container
How to save a file into persistent storage
How to demonstrate that the attached volume is persistent
Prerequisites
1 Hosting
You need a EO-Lab hosting account with Horizon interface https://cloud.fra1-1.cloudferro.com/auth/login/?next=/.
2 Creating clusters with CLI
The article How To Use Command Line Interface for Kubernetes Clusters On EO-Lab OpenStack Magnum will introduce you to creation of clusters using a command line interface.
3 Connect openstack client to the cloud
Prepare openstack and magnum clients by executing Step 2 Connect OpenStack and Magnum Clients to Horizon Cloud from article How To Install OpenStack and Magnum Clients for Command Line Interface to EO-Lab Horizon
4 Check available quotas
Before creating additional cluster check the state of the resources with Horizon commands Computer => Overview.
5 Private and public keys
An SSH key-pair created in OpenStack dashboard. To create it, follow this article How to Create Key Pair in OpenStack Dashboard on EO-Lab. You will have created keypair called “sshkey” and you will be able to use it for this tutorial as well.
6 Types of Volumes
Types of volumes are described in the official Kubernetes documentation.
Step 1 - Create Cluster Using –docker-volume-size
You are going to create a new cluster called dockerspace that will use parameter –docker-volume-size using the following command:
openstack coe cluster create dockerspace
  --cluster-template k8s-1.23.16-cilium-v1.0.3
  --keypair sshkey
  --master-count 1
  --node-count 2
  --docker-volume-size 50
  --master-flavor eo1.large
  --flavor eo2.large
After a few minutes the new cluster dockerspace will be created.
Click on Container Infra => Clusters to show the three clusters in the system: authenabled, k8s-cluster and dockerspace.
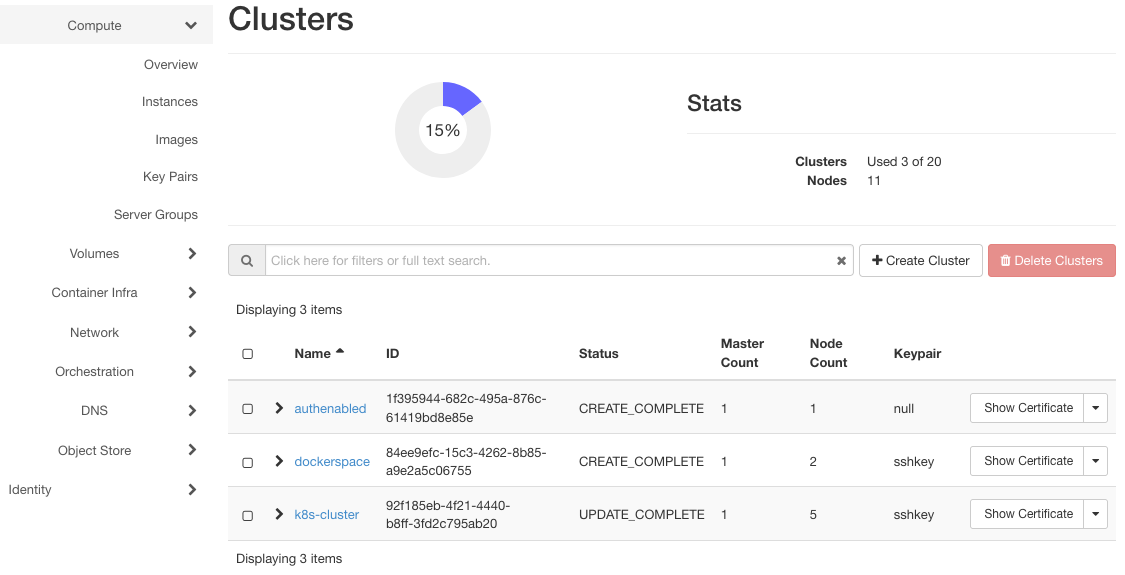
Here are their instances (after clicking on Compute => Instances):
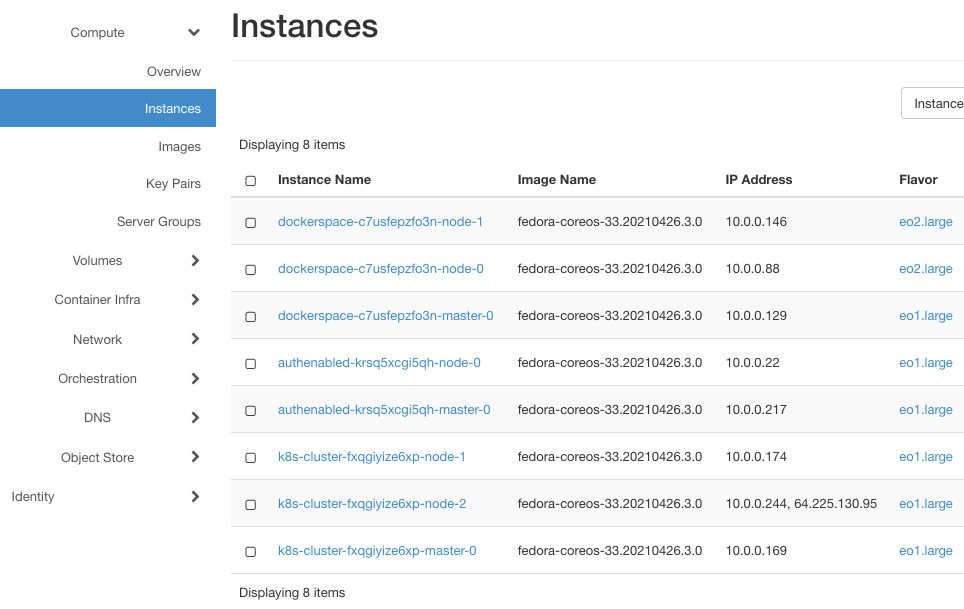
They will have at least two instances each, one for the master and one for the worker node. dockerspace has three instances as it has two worker nodes, created with flavor eo2.large.
So far so good, nothing out of the ordinary. Click on Volumes => Volumes to show the list of volumes:
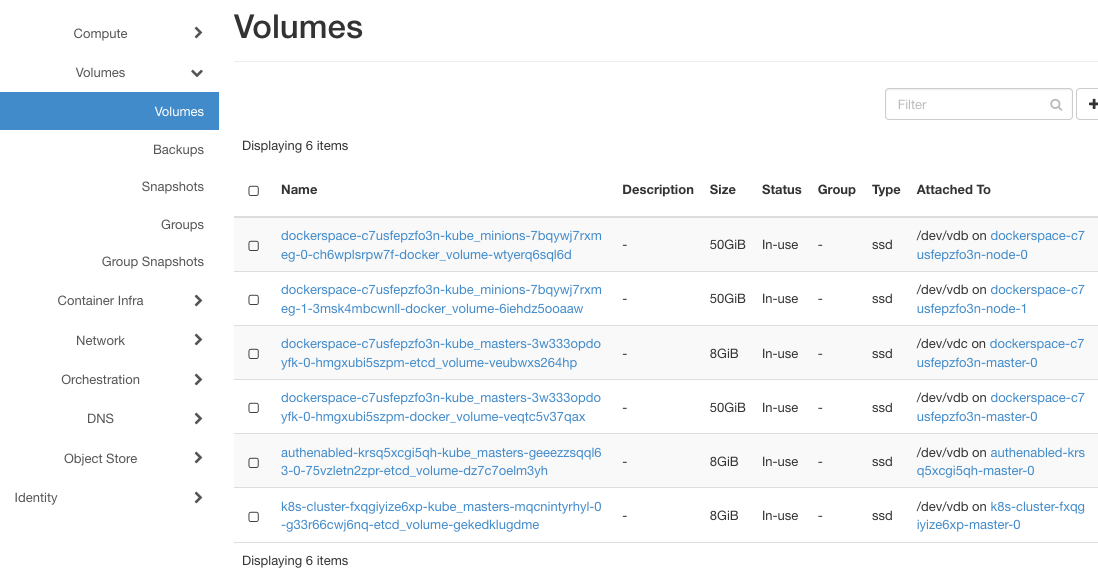
If –docker-volume-size is not turned on, only instances with etcd-volume in their names would appear here, as is the case for clusters authenabled and k8s-cluster. If it is turned on, additional volumes would appear, one for each node. dockerspace will, therefore, have one instance for master and two instances for worker nodes.
Note the column Attached. All nodes for dockerspace use /dev/vdb for storage, which is a fact that will be important later on.
As specified during creation, docker-volumes have size of 50 GB each.
In this step, you have created a new cluster with docker storage turned on and then you verified that the main difference lies in creation of volumes for the cluster.
Step 2 - Create Pod Manifest
To create a pod, you need to use a file in yaml format that defines the parameters of the pod. Use command
nano redis.yaml
to create file called redis.yaml and copy the following rows into it:
apiVersion: v1
kind: Pod
metadata:
  name: redis
spec:
  containers:
  - name: redis
    image: redis
    volumeMounts:
    - name: redis-storage
      mountPath: /data/redis
  volumes:
  - name: redis-storage
    emptyDir: {}
This is how it will look like in the terminal:
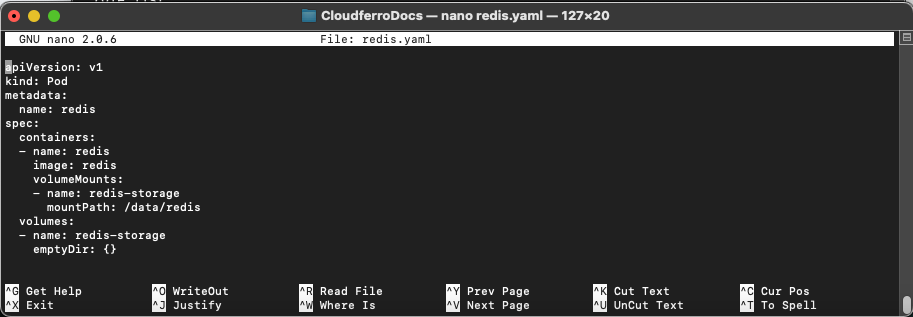
You are creating a Pod, its name will be redis, and it will occupy one container also called redis. The content of that container will be an image called redis.
Redis is a well known database and its image is prepared in advance so can be pulled off directly from a repository. If you were implementing your own application, the best way would be to release it through Docker and pull from its repository.
New volume is called redis-storage and its directory will be /data/redis. The name of the volume will again be redis-storage and it will be of type emptyDir.
An emptyDir volume is initially empty and is first created when a Pod is assigned to a node. It will exist as long as that Pod is running there and if the Pod is removed, the related data in emptyDir will be deleted permanently. However, the data in an emptyDir volume is safe across container crashes.
Besides emptyDir, about a dozen other volume types could have been used here: awsElasticBlockStore, azureDisk, cinder and so on.
In this step, you have prepared pod manifest with which you will create the pod in the next step.
Step 3 - Create a Pod on Node 0 of dockerspace
In this step you will create a new pod on node 0 of dockerspace cluster.
First see what pods are available in the cluster:
kubectl get pods
This may produce error line such as this one:
The connection to the server localhost:8080 was refused - did you specify the right host or port?
That will happen in case you did not set up the kubectl parameters as specified in Prerequisites No. 3. You will now set it up for access to dockerstate:
mkdir dockerspacedir

openstack coe cluster config
--dir dockerspacedir
--force
--output-certs
dockerspace
First create a new directory, dockerspacedir, where the config file for access to the cluster will reside, then execute the cluster config command. The output will be a line like this:
export KUBECONFIG=/Users/duskosavic/CloudferroDocs/dockerspacedir/config
Copy it and enter again as the command in terminal. That will give kubectl app access to the cluster. Create the pod with this command:
kubectl apply -f redis.yaml
It will read parameters in redis.yaml file and send them to the cluster.
Here is the command to access all pods, if any:
kubectl get pods

NAME    READY   STATUS              RESTARTS   AGE
redis   0/1     ContainerCreating   0          7s
Repeat the command after a few seconds and see the difference:
kubectl get pods

NAME    READY   STATUS    RESTARTS   AGE
redis   1/1     Running   0          81s
In this step, you have created a new pod on cluster dockerspace and it is running.
In the next step, you will enter the container and start issuing commands just like you would in any other Linux environment.
Step 4 - Executing bash Commands in the Container
In this step, you will start bash shell in the container, which in Linux is equivalent to start running the operating system:
kubectl exec -it redis -- /bin/bash
The following listing is a reply:
root@redis:/data# df -h
Filesystem      Size  Used Avail Use% Mounted on
overlay          50G  1.4G   49G   3% /
tmpfs            64M     0   64M   0% /dev
tmpfs           3.9G     0  3.9G   0% /sys/fs/cgroup
/dev/vdb         50G  1.4G   49G   3% /data
/dev/vda4        32G  4.6G   27G  15% /etc/hosts
shm              64M     0   64M   0% /dev/shm
tmpfs           3.9G   16K  3.9G   1% /run/secrets/kubernetes.io/serviceaccount
tmpfs           3.9G     0  3.9G   0% /proc/acpi
tmpfs           3.9G     0  3.9G   0% /proc/scsi
tmpfs           3.9G     0  3.9G   0% /sys/firmware
This is what it would look like in the terminal:
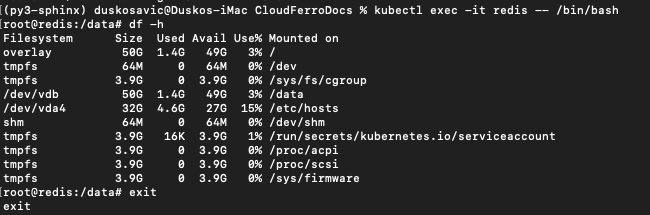
Note that the prompt changed to
root@redis:/data#
which means you are now issuing commands within the container itself. The pod operates as Fedora 33 and you can use df to see the volumes and their sizes. Command
df -h
lists sizes of files and directories in a human fashion (the usual meaning of parameter -h would be Help, while here it is short for Human).
In this step, you have activated the container operating system.
Step 5 - Saving a File Into Persistent Storage
In this step you are going to test the longevity of files on persistent storage. You will first
save a file into the /data/redis directory, then
kill the Redis process, which in turn will
kill the container; finally, you will
re-enter the pod,
where you will find the file intact.
Note that dev/vdb has 50 GB in size in the above listing and connect it to the column Attached To in the Volumes => Volumes listing:

In its own turn, it is tied to an instance:

That instance is injected into the container and – being an independent instance – acts as persistent storage to the pod.
Create a file on the redis container:
cd /data/redis/
echo Hello > test-file
Install software to see the PID number of Redis process in the container
apt-get update
apt-get install procps
ps aux
These are the running processes:

Take the PID number for Redis process (here it is 1), and eliminate it with command
kill 1
That will first kill the container and then exit its command line.
In this step, you have created a file and killed the container that contains the file. This sets up the ground for testing whether the files survive container crash.
Step 6 - Check the File Saved in Previous Step
In this step, you will find out whether the file test-file is still existing.
Enter the pod again, activate its bash shell and see whether the file has survived:
kubectl exec -it redis -- /bin/bash
cd redis
ls

test-file
Yes, the file test-file is still there. The persistent storage for the pod contains it in path /data/redis:

In this step, you have entered the pod again and found out that the file has survived intact. That was expected, as volumes of type emptyDir will survive container crashes as long as the pod is existing.
What To Do Next
emptyDir survives container crashes but will disappear when the pod disappears. Other volume types may survive loss of pods better. For instance:
awsElasticBlockStore will have the volume unmounted when the pod is gone; being unmounted and not destroyed, it will persist the data it is containing. This type of volume can have pre-populated data and can share the data among the pods.
cephfs can also have pre-populated data and share them among the pods, but can additionally also be mounted by multiple writers at the same time.
Other constraints may also apply. Some of those volume types will require their own servers to be activated first, or that all nodes on which Pods are running need be of the same type and so on. Prerequisite No. 6 will list all types of volumes for Kubernetes clusters so study it and apply to your own Kubernetes apps.