Deploying HTTPS Services on Magnum Kubernetes in EO-Lab FRA1-1
Kubernetes makes it very quick to deploy and publicly expose an application, for example using the LoadBalancer service type. Sample deployments, which demonstrate such capability, are usually served with HTTP. Deploying a production-ready service, secured with HTTPS, can also be done smoothly, by using additional tools.
In this article, we show how to deploy a sample HTTPS-protected service on EO-Lab FRA1-1.
What We are Going to Cover
Install Cert Manager’s Custom Resource Definitions
Install Cert Manager Helm chart
Create a Deployment and a Service
Create and Deploy an Issuer
Associate the domain with NGINX Ingress
Create and Deploy an Ingress Resource
Prerequisites
No. 1 Account
You need a EO-Lab hosting account with access to the Horizon interface: https://cloud.fra1-1.cloudferro.com/auth/login/?next=/.
No. 2 Kubernetes cluster deployed on FRA1-1 cloud, with NGINX Ingress enabled
See this article How to Create a Kubernetes Cluster Using EO-Lab OpenStack Magnum
No. 3 Familiarity with kubectl
For further instructions refer to How To Access Kubernetes Cluster Post Deployment Using Kubectl On EO-Lab OpenStack Magnum
No. 4 Familiarity with Kubernetes Ingress feature
It is explained in article Using Kubernetes Ingress on EO-Lab FRA1-1 OpenStack Magnum
No. 5 Familiarity with deploying Helm charts
See this article:
Deploying Helm Charts on Magnum Kubernetes Clusters on EO-Lab FRA1-1
No. 6 Must have domain purchased from a registrar
You also must own a domain purchased from any registrar (domain reseller). Obtaining a domain from registrars is not covered in this article.
No. 7 Use DNS command Horizon to connect to the domain name
This is optional. Here is the article with detailed information:
Step 1 Install Cert Manager’s Custom Resource Definitions (CRDs)
We assume you have your
Magnum cluster up and running and
kubectl pointing to your cluster config file.
As a pre-check, you can list the nodes on your cluster:
# export KUBECONFIG=<your-kubeconfig-file-location>
kubectl get nodes
CertManager Helm chart utilizes a few of Custom Resource Definitions (CRDs) which we will need to deploy on our cluster. Aside from multiple default Kubernetes-available resources (e.g., Pods, Deployments or Services), CRDs enable to deploy custom resources defined by third party developers to satisfy further customized use cases. Let’s add CRDs to our cluster with the following command:
kubectl apply -f https://github.com/cert-manager/cert-manager/releases/download/v1.9.2/cert-manager.crds.yaml
The list of the resources will be displayed after running the command. If we want to later refer to them we can also use the following kubectl command:
kubectl get crd -l app.kubernetes.io/name=cert-manager
...
NAME                                  CREATED AT
certificaterequests.cert-manager.io   2022-12-18T11:15:08Z
certificates.cert-manager.io          2022-12-18T11:15:08Z
challenges.acme.cert-manager.io       2022-12-18T11:15:08Z
clusterissuers.cert-manager.io        2022-12-18T11:15:08Z
issuers.cert-manager.io               2022-12-18T11:15:08Z
orders.acme.cert-manager.io           2022-12-18T11:15:08Z
Warning
Magnum introduces a few pod security policies (PSP) which provide some extra safety precautions for the cluster, but will cause conflict with the CertManager Helm chart. PodSecurityPolicy is deprecated until Kubernetes v. 1.25, but still supported in version of Kubernetes 1.21 to 1.23 available on EO-Lab cloud. The commands below may produce warnings about deprecation but the installation should continue nevertheless.
Step 2 Install CertManager Helm chart
We assume you have installed Helm according to the article mentioned in Prerequisite No. 5. The result of that article will be file my-values.yaml and in order to ensure correct deployment of CertManager Helm chart, we will need to
override it and
insert the appropriate content into it:
my-values.yaml
global:
  podSecurityPolicy:
    enabled: true
    useAppArmor: false
The following code will both install the CertManager Helm chart into a namespace cert-manager and use my-values.yaml at the same time:
helm repo add jetstack https://charts.jetstack.io
helm repo update
helm install cert-manager jetstack/cert-manager --namespace cert-manager --create-namespace --version v1.9.2 --values my-values.yaml
This is the result:
helm install cert-manager jetstack/cert-manager --namespace cert-manager --create-namespace --version v1.9.2 --values my-values.yaml
W0208 10:16:08.364635     212 warnings.go:70] policy/v1beta1 PodSecurityPolicy is deprecated in v1.21+, unavailable in v1.25+
W0208 10:16:08.461599     212 warnings.go:70] policy/v1beta1 PodSecurityPolicy is deprecated in v1.21+, unavailable in v1.25+
W0208 10:16:08.502602     212 warnings.go:70] policy/v1beta1 PodSecurityPolicy is deprecated in v1.21+, unavailable in v1.25+
W0208 10:16:11.489377     212 warnings.go:70] policy/v1beta1 PodSecurityPolicy is deprecated in v1.21+, unavailable in v1.25+
W0208 10:16:11.489925     212 warnings.go:70] policy/v1beta1 PodSecurityPolicy is deprecated in v1.21+, unavailable in v1.25+
W0208 10:16:11.524300     212 warnings.go:70] policy/v1beta1 PodSecurityPolicy is deprecated in v1.21+, unavailable in v1.25+
W0208 10:16:13.949045     212 warnings.go:70] policy/v1beta1 PodSecurityPolicy is deprecated in v1.21+, unavailable in v1.25+
W0208 10:16:15.038803     212 warnings.go:70] policy/v1beta1 PodSecurityPolicy is deprecated in v1.21+, unavailable in v1.25+
W0208 10:17:36.084859     212 warnings.go:70] policy/v1beta1 PodSecurityPolicy is deprecated in v1.21+, unavailable in v1.25+
NAME: cert-manager
LAST DEPLOYED: Wed Feb  8 10:16:07 2023
NAMESPACE: cert-manager
STATUS: deployed
REVISION: 1
TEST SUITE: None
NOTES:
cert-manager v1.9.2 has been deployed successfully!

In order to begin issuing certificates, you will need to set up a ClusterIssuer
or Issuer resource (for example, by creating a 'letsencrypt-staging' issuer).
We see that cert-manager is deployed successfully but also get a hint that ClusterIssuer or an Issuer resource has to be installed as well. Our next step is to install a sample service into the cluster and then continue with creation and deployment of an Issuer.
Step 3 Create a Deployment and a Service
Let’s deploy NGINX service as a standard example of a Kubernetes app. First we create a standard Kubernetes deployment and then a service of type NodePort. Write the following contents to file my-nginx.yaml :
my-nginx.yaml
apiVersion: apps/v1
kind: Deployment
metadata:
  name: my-nginx-deployment
spec:
  selector:
    matchLabels:
      run: my-nginx
  replicas: 1
  template:
    metadata:
      labels:
        run: my-nginx
    spec:
      containers:
      - name: my-nginx
        image: nginx
        ports:
        - containerPort: 80
---
apiVersion: v1
kind: Service
metadata:
  name: my-nginx-service
  labels:
    run: my-nginx
spec:
  type: NodePort
  ports:
  - port: 80
    protocol: TCP
  selector:
    run: my-nginx
Deploy with the following command:
kubectl apply -f my-nginx.yaml
Step 4 Create and Deploy an Issuer
Now install an Issuer. It is a custom Kubernetes resource and represents Certificate Authority (CA), which ensures that our HTTPS are signed and therefore trusted by the browsers. CertManager supports different issuers, in our example we will use Let’s Encrypt, that uses ACME protocol.
Create a new file called my-nginx-issuer.yaml and paste the following content into it. Change the email address XXXXXXXXX@YYYYYYYYY.com to your own and real email address.
my-nginx-issuer.yaml
apiVersion: cert-manager.io/v1
kind: Issuer
metadata:
  name: my-nginx-issuer
spec:
  acme:
    email: XXXXXXXXX@YYYYYYYYY.com
    server: https://acme-v02.api.letsencrypt.org/directory # production
    privateKeySecretRef:
      name: letsencrypt-secret # different secret name than for ingress
    solvers:
      # HTTP-01 challenge provider, creates additional ingress, refer to CertManager documentation for detailed explanation
      - http01:
          ingress:
            class: nginx
Then deploy on the cluster:
kubectl apply -f my-nginx-issuer.yaml
As a result, the Issuer gets deployed, and a Secret called letsencrypt-secret with a private key is deployed as well.
Step 5 Associate the Domain with NGINX Ingress
To see the site in browser, your HTTPS certificate will need to be associated with a specific domain. To follow along, you should have a real domain already registered at a domain registrar.
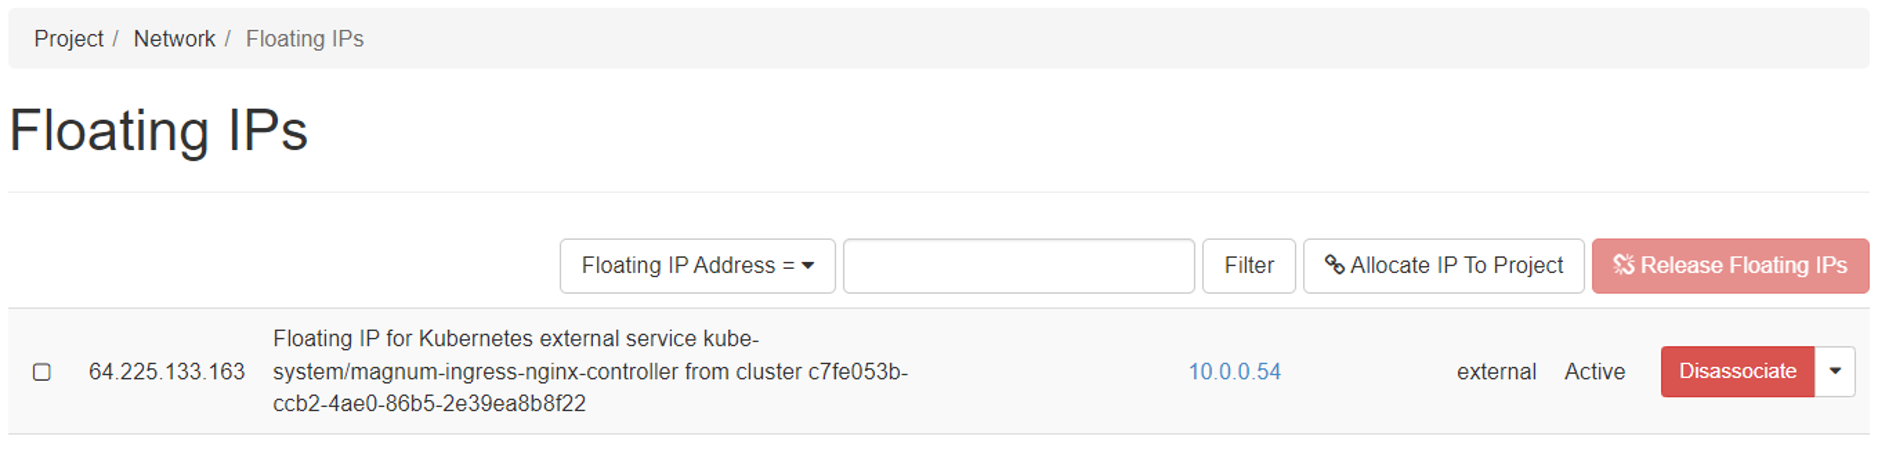
When you deployed your cluster with NGINX ingress, behind the scenes a LoadBalancer was deployed, with a public IP address exposed. You can obtain this address by looking it up in the Horizon web interface. If your list or floating IPs is longer, it can be easily recognized by name:
Now, at your domain registrar you need to associate the A record of the domain with the floating IP address of the ingress, where your application will be exposed. The way to achieve this will vary by the specific registrar, so we will not provide detailed instructions here.
You can also use the DNS command in Horizon to connect the domain name you have with the cluster. See Prerequisite No. 7 for additional details.
Step 6 Create and Deploy an Ingress Resource
The final step is to deploy the Ingress resource. This will perform the necessary steps to initiate the certificate signing request with the CA and ultimately provide the HTTPS certificate for your service. In order to proceed, place the contents below into file my-nginx-ingress.yaml. Replace mysampledomain.eu with your domain.
my-nginx-ingress.yaml
apiVersion: networking.k8s.io/v1
kind: Ingress
metadata:
  name: my-nginx-ingress
  annotations:
    nginx.ingress.kubernetes.io/rewrite-target: /
    # below annotation is for using cert manager's "ingress shim", refer to CertManager documentation
    cert-manager.io/issuer: my-nginx-issuer # use the name of the issuer here
spec:
  ingressClassName: nginx
  tls:
  - hosts:
    - mysampledomain.eu #change to own domain
    secretName: my-nginx-secret
  rules:
  - host: mysampledomain.eu #change to own domain
    http:
      paths:
      - path: /*
        pathType: Prefix
        backend:
          service:
            name: my-nginx-service
            port:
              number: 80
Then deploy with:
kubectl apply -f my-nginx-ingress.yaml
If all works well, the effort is complete and after a couple of minutes we should see the lock sign in front of our IP address. The service is now HTTPS-secured, and you can verify the details of the certificate by clicking on the lock icon.

What To Do Next
The article Using Kubernetes Ingress on EO-Lab FRA1-1 OpenStack Magnum shows how to create an HTTP based service or a site.
If you need additional information on Helm charts: Deploying Helm Charts on Magnum Kubernetes Clusters on EO-Lab FRA1-1.