Installing JupyterHub on Magnum Kubernetes Cluster in EO-Lab FRA1-1
Jupyter notebooks are a popular method of presenting application code, as well as running exploratory experiments and analysis, conveniently, from a web browser. From a Jupyter notebook, one can run code, see the generated results in attractive visual form, and often also interactively interact with the generated output.
JupyterHub is an open-source service that creates cloud-based Jupyter notebook servers, on-demand, enabiling users to run their notebooks without being concerned about the setup and required resources.
It is straightforward to quickly deploy JupyterHub using Magnum Kubernetes service, which we present in this article.
What We are Going to Cover
Authenticate to the cluster
Run Jupyterhub Helm chart installation
Retrieve details of Jupyterhub service
Run Jupyterhub on HTTPS
Prerequisites
No. 1 Account
You need a EO-Lab hosting account with access to the Horizon interface: https://cloud.fra1-1.cloudferro.com/auth/login/?next=/.
No. 2 kubectl up and running
For further instructions refer to How To Access Kubernetes Cluster Post Deployment Using Kubectl On EO-Lab OpenStack Magnum
No. 3 Helm up and running
Helm is package manager for Kubernetes as explained in article
Deploying Helm Charts on Magnum Kubernetes Clusters on EO-Lab FRA1-1
No. 4 A registered domain name available
To see the results of the installation, you should have a registered domain of your own. You will use it in Step 5 to run JupyterHub on HTTPS in a browser.
Step 1 Authenticate to the cluster
First of all, we need to authenticate to the cluster. It may so happen that you already have a cluster at your disposal and that the config file is already in place. In other words, you are able to execute the kubectl command immediately.
You may also create a new cluster and call it, say, jupyter-cluster, as explained in Prerequisite No. 2. In that case, run from your local machine the following command to create config file in the present working directory:
openstack coe cluster config jupyter-cluster
This will output the command to set the KUBECONFIG env, which is a variable pointing to the location of your newly created cluster e.g.
export KUBECONFIG=/home/eouser/config
Run this command.
Step 2 Apply preliminary configuration
OpenStack Magnum by default applies certain security restrictions for pods running on the cluster, in line with “least privileges” practice. JupyterHub will require some additional privileges in order to run correctly.
We will start by creating a dedicated namespace for our JupyterHub Helm artifacts:
kubectl create namespace jupyterhub
The next step is to create a RoleBinding that will add a magnum:podsecuritypolicy:privileged ClusterRole to the ServiceAccount which will be later deployed by JupyterHub Helm chart in the jupyterhub namespace. This role will enable additional privileges to this Service Account. Create a file jupyterhub-rolebinding.yaml with the following contents:
jupyterhub-rolebinding.yaml
apiVersion: rbac.authorization.k8s.io/v1
kind: RoleBinding
metadata:
  name: jupyterhub-rolebinding
  namespace: jupyterhub
subjects:
- apiGroup: rbac.authorization.k8s.io
  kind: Group
  name: system:serviceaccounts
roleRef:
  apiGroup: rbac.authorization.k8s.io
  kind: ClusterRole
  name: magnum:podsecuritypolicy:privileged
Then apply with:
kubectl apply -f jupyterhub-rolebinding.yaml
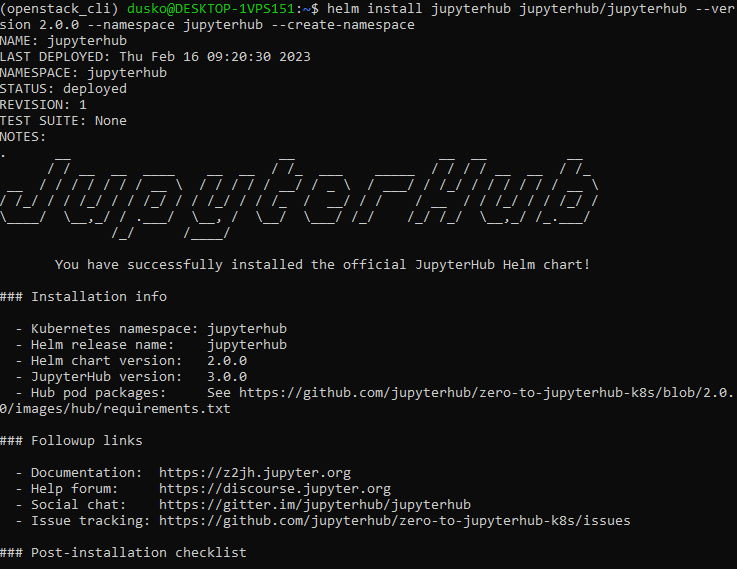
Step 3 Run Jupyterhub Helm chart installation
To install Helm chart with the default settings use the below set of commands. This will
download and update the JupyterHub repository, and
install the chart to the jupyterhub namespace.
helm repo add jupyterhub https://hub.jupyter.org/helm-chart/
helm repo update
helm install jupyterhub jupyterhub/jupyterhub --version 2.0.0 --namespace jupyterhub
This is the result of successful Helm chart installation:
Step 4 Retrieve details of your service
Once all the Helm resources get deployed to the jupyterhub namespace, we can view their state and definitions using standard kubectl commands.
To view the services resource created by Helm, execute the following command:
kubectl get services -n jupyterhub
There are several resources created and a few services. The one most interesting to us is the proxy-public service of type LoadBalancer, which exposes JupyterHub to the public network:
$ kubectl get services -n jupyterhub
NAME           TYPE           CLUSTER-IP       EXTERNAL-IP      PORT(S)        AGE
hub            ClusterIP      10.254.209.133   <none>           8081/TCP       18d
proxy-api      ClusterIP      10.254.86.239    <none>           8001/TCP       18d
proxy-public   LoadBalancer   10.254.168.141   64.225.131.136   80:31027/TCP   18d
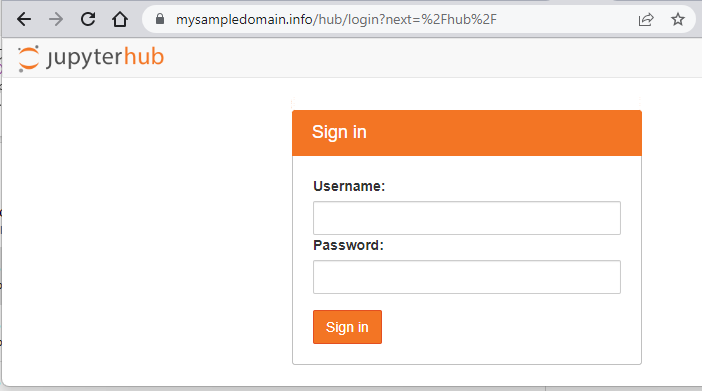
The External IP of the proxy-public service will be initially in <pending> state. Refresh this command and after 2-5 minutes, you will see the floating IP assigned to the service. You can then type this IP into the browser.
First, you will enter the login screen. Provide any combination of dummy login and password, after a moment JupyterHub gets loaded into the browser:
JupyterHub is now working on HTTP and a direct IP address and you can use it as is.
Warning
If in the next step you start running a JupyterHub on HTTPS, you will not be able to run it as a HTTP service unless it has been relaunched.
Step 5 Run on HTTPS
JupyterHub Helm chart enables HTTPS deployments natively. Once we deployed the chart above, we can simply upgrade the chart to enable serving it on HTTPS. Under the hood, it will generate the certificates using Let’s Encrypt certificate authority.
In order to do enable HTTPS, prepare a file for the configuration override e.g. jupyter-https-values.yaml with the following contents (adjust the email and domain to your own):
jupyter-https-values.yaml
proxy:
  https:
    enabled: true
    hosts:
      - mysampledomain.info
    letsencrypt:
      contactEmail: pturkowski@cloudferro.com
Then upgrade the chart with the following upgrade command:
helm upgrade -n jupyterhub jupyterhub jupyterhub/jupyterhub -f jupyter-https-values.yaml
As noted in Prerequisite No. 4, you should have an available registered domain so that you can now point it to address that the LoadBalancer for service proxy-public returned above. Please ensure that the records in your domain registrar are correctly associated. Concretely, we’ve associated the A record set of mysampledomain.info with the record 64.225.131.136 (the public IP address or our service). Once this is done, the JupyterHub gets served on HTTPS:
What To Do Next
For the production environment: replace the dummy authenticator with an alternative authentication mechanism, ensure persistence by e.g. connecting to a Postgres database. These steps are beyond the scope of this article.