How To Access Kubernetes Cluster Post Deployment Using Kubectl On EO-Lab OpenStack Magnum
In this tutorial, you start with a freshly installed Kubernetes cluster on Cloudferro OpenStack server and connect the main Kubernetes tool, kubectl to the cloud.
What We Are Going To Cover
How to connect kubectl to the OpenStack Magnum server
How to access clusters with kubectl
Prerequisites
No. 1 Hosting
You need a EO-Lab hosting account with Horizon interface https://cloud.fra1-1.cloudferro.com/auth/login/?next=/.
No. 2 Installation of kubectl
Standard types of kubectl installation are described on Install Tools page of the official Kubernetes site.
No. 3 A cluster already installed on Magnum site
You may already have a cluster installed if you have followed one of these articles:
With Horizon interface: How to Create a Kubernetes Cluster Using EO-Lab OpenStack Magnum.
With command line interface: How To Use Command Line Interface for Kubernetes Clusters On EO-Lab OpenStack Magnum.
Or, you may want to create a new cluster called k8s-cluster, just for this occasion – by using the following CLI command:
openstack coe cluster create \
--cluster-template k8s-stable-1.23.5 \
--labels eodata_access_enabled=false,floating-ip-enabled=true,master-lb-enabled=true \
--merge-labels \
--keypair sshkey \
--master-count 3 \
--node-count 2 \
--master-flavor eo1.large \
--flavor eo1.large \
k8s-cluster
Warning
It takes some 10-20 minutes for the new cluster to form.
In the rest of this text we shall use cluster name k8s-cluster – be sure to use the name of the existing cluster instead.
No. 4 Connect openstack client to the cloud
Prepare openstack and magnum clients by executing Step 2 Connect OpenStack and Magnum Clients to Horizon Cloud from article How To Install OpenStack and Magnum Clients for Command Line Interface to EO-Lab Horizon.
The Plan
Follow up the steps listed in Prerequisite No. 2 and install kubectl on the platform of your choice.
Use the existing Kubernetes cluster on Cloudferro or install a new one using the methods outlined in Prerequisites Nos. 3.
Use Step 2 in Prerequisite No. 4 to enable connection of openstack and magnum clients to the cloud.
You are then going to connect kubectl to the Cloud.
Step 1 Create directory to download the certificates
Create a new directory called k8sdir into which the certificates will be downloaded:
mkdir k8sdir
Once the certificate file is downloaded, you will execute a command similar to this:
export KUBECONFIG=/home/dusko/k8sdir/config
This assumes
using an Ubuntu environment (/home),
that the user is dusko,
the directory you just created /k8sdir and, finally, that
config is the file which contains data for authorizing to the Kubernetes cluster.
Note
In Linux, a file may or may not have an extension, while on Windows, it must have an extension.
Step 2A Download Certificates From the Server using the CLI commands
You will use command
openstack coe cluster config
to download the files that kubectl needs for authentication with the server. See its input parameters using the –help parameter:
openstack coe cluster config --help
usage: openstack coe cluster config [-h]
   [--dir <dir>] [--force] [--output-certs]
   [--use-certificate] [--use-keystone]
    <cluster>

Get Configuration for a Cluster

positional arguments:
  <cluster>    The name or UUID of cluster to update

optional arguments:
  -h, --help           show this help message and exit
  --dir <dir>  Directory to save the certificate and config files.
  --force              Overwrite files if existing.
  --output-certs       Output certificates in separate files.
  --use-certificate    Use certificate in config files.
  --use-keystone       Use Keystone token in config files.
Download the certificates into the k8sdir folder:
openstack coe cluster config \
--dir k8sdir \
--force \
--output-certs \
k8s-cluster
Four files will be downloaded into the folder:
ls k8sdir
ca.pem               cert.pem        config          key.pem
Parameter –output-certs produces .pem files, which are X.509 certificates, originally created so that they can be sent via email. File config combines the .pem files and contains all the information needed for kubectl to access the cloud. Using –force overwrites the existing files (if any), so you are guaranteed to work with only the latest versions of the files from the server.
The result of this command is shown in the row below:
export KUBECONFIG=/home/dusko/k8sdir/config
Copy this command and paste it into the command line of terminal, then press the Enter key on the keyboard to execute it. System variable KUBECONFIG will be thus initialized and the kubectl command will have access to the config file at all times.
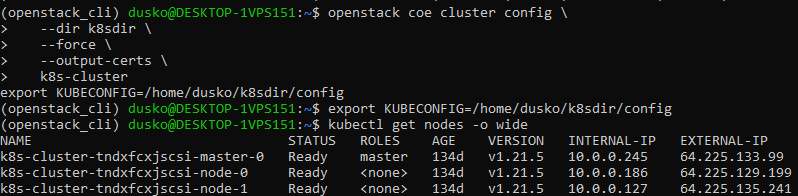
This is the entire procedure in terminal window:
Step 2B Download Certificates From the Server using Horizon commands
You can download the config file from Horizon directly to your computer. First list the clusters with command Container Infra -> Clusters, find the cluster and click on the rightmost drop-down menu in its column:
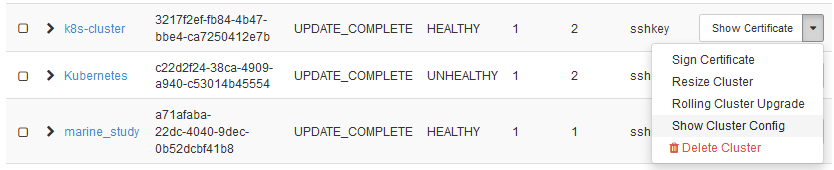
Click on option Show Cluster Config and the config file will be downloaded to the editor:
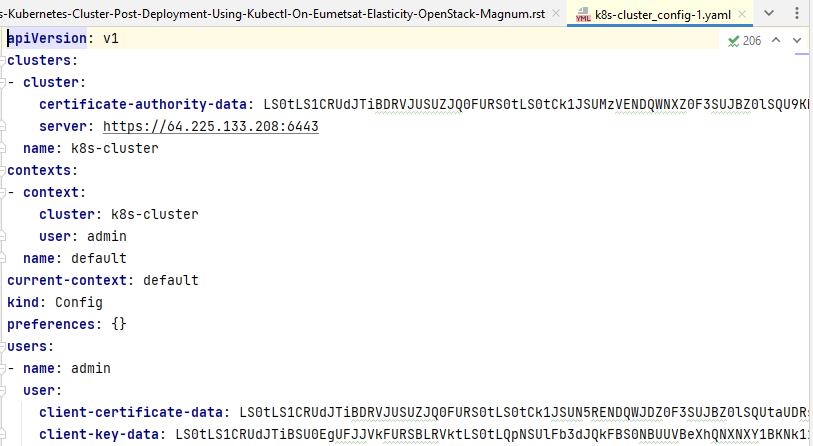
From the editor, save it on disk. The file name will combine the name of the cluster with the word config and if you have downloaded the same file several times, there may be a dash followed by a number, like this:
k8s-cluster-config-1.yaml
For uniformity, save it to the same folder k8sdir as the config file and set up the KUBECONFIG variable to that address:
export KUBECONFIG=/home/dusko/k8sdir/k8s-cluster_config-1.yaml
Depending on your environment, you may need to open a new terminal window to make the above command work.
Step 3 Verify That kubectl Has Access to the Cloud
See basic data about the cluster with the following command:
kubectl get nodes -o wide
The result is:

That verifies that kubectl has proper access to the cloud.
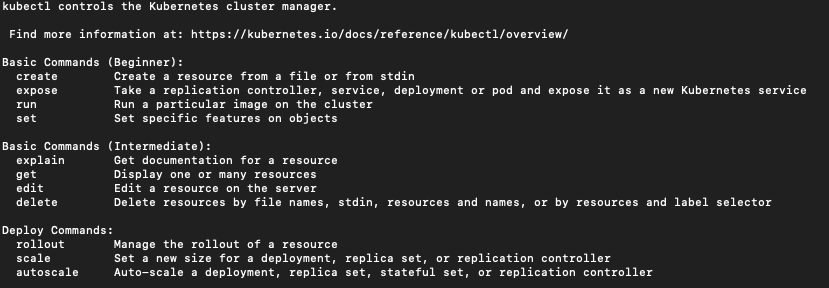
To see available commands kubectl has, use:
kubectl --help
The listing is too long to reproduce here, but here is how it starts:
kubectl also has a long list of options, which are parameters that can be applied to any command. See them with
kubectl options
What To Do Next
With kubectl operational, you can
deploy apps on the cluster,
access multiple clusters,
create load balancers,
access applications in the cluster using port forwarding,
use Service to access application in a cluster,
list container images in the cluster
use Services, Deployments and all other resources in a Kubernetes cluster.
Kubernetes dashboard is a visual alternative to kubectl. To install it, see Using Dashboard To Access Kubernetes Cluster Post Deployment On EO-Lab OpenStack Magnum.