Accessing EODATA from Kubernetes Pods in EO-Lab FRA1-1 using boto3
While using Kubernetes on EO-Lab clouds, you might soon want to access EODATA satellite image repository.
A common use case can be e.g. batch job processing, where Kubernetes pods initiate download of EODATA images to process them further.
This article explains how EODATA access is implemented on OpenStack Magnum and is using Python’s library boto3 to access EODATA from Kubernetes pods. Docker and DockerHub will serve to containerize and deploy the application accessing EODATA.
Prerequisites
No. 1 Account
You need a EO-Lab hosting account with access to the Horizon interface: https://cloud.fra1-1.cloudferro.com/auth/login/?next=/.
No. 2 Kubernetes cluster with access to EODATA
A Kubernetes cluster on EO-Lab FRA1-1 created with option “EODATA access enabled”. Refer to the knowledge base article How to Create a Kubernetes Cluster Using EO-Lab OpenStack Magnum.
No. 3 Familiarity with kubectl
For further instructions refer to How To Access Kubernetes Cluster Post Deployment Using Kubectl On EO-Lab OpenStack Magnum
No. 4 Understanding how boto3 library accesses EODATA
To understand how to access EODATA without Kubernetes, study this article: How to download EODATA file using boto3 on EO-Lab
The article you are reading now is actually the above article transposed to Kubernetes environment.
In particular, article How to get credentials used for accessing EODATA on a cloud VM on EO-Lab explains how to get proper credentials depending on the cloud used.
No. 5 Docker installed on your machine
See How to install and use Docker on Ubuntu 24.04.
No. 6 An account in DockerHub
An account in DockerHub. You can use other image registries, but that is beyond the scope of this article.
What We Are Going To Do
Provide background information on using EODATA on Magnum
Prepare Docker image of an application accessing EODATA with boto3
Build Docker image and push it to DockerHub
Launch Kubernetes pod with Docker container and verify EODATA access
Step 1 Create Kubernetes cluster with EODATA
On EO-Lab FRA1-1, every project has, by default, EODATA network attached. Thus, when creating a virtual machine in OpenStack, there is an option to add EODATA network to such a VM.
Since a Kubernetes cluster built on Magnum is created from those same VMs, you can provide access to EODATA to each worker node in the cluster. Use commands Container Infra → Clusters → Create Cluster to start creation of a cluster and tick the box “EODATA access enabled”.

After the creation of the cluster is finished, check whether the nodes were properly connected to EODATA. Run Compute → Instances and verify that the IP address of your worker nodes is on EODATA network. In the image below, marine-study is the name of the cluster while eodata_00341_3 will be the name of EODATA network:
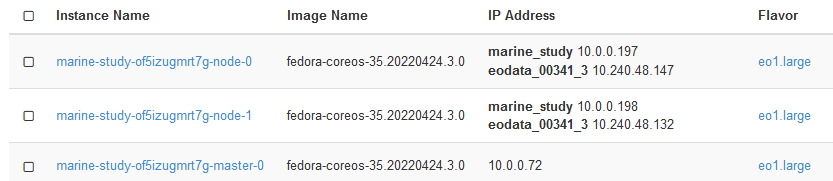
Two worker nodes are linked to eodata_ network while the master node is not. That is because Master Nodes manage the cluster and are not provisioned with access to EODATA.
Here is how you can deliver the software for EODATA access through a Docker image.
Step 2 Prepare the application’s Docker image
boto3 is a standard Python library for interacting with S3 object storage. Strategically speaking, the container you are building must contain the following elements:
Python and boto3 installed
correct endpoints for accessing EODATA
S3 credentials to access that endpoint.
With the following three files, you can “dockerize” your application, that is, build its Docker image and send it to DockerHub:
a concrete Python file with application code (app.py in our case)
requirements.txt file that specifies the dependencies for boto3 library
Dockerfile that provides instructions for the container build
Dockerfile will be based on Python 3.8, will install boto3 and then run the application. In application code, you download a sample image and make the container wait for 300 seconds. You only need a few seconds to verify that the image was properly downloaded, so five minutes will be more than enough. Create the following three files and place them into the same directory:
app.py
On WAW3-1 cloud, the access and secret key pair can be any string.
import boto3
import time

access_key='anystring'
secret_key='anystring'
key='Landsat-5/TM/L1T/2011/11/11/LS05_RKSE_TM__GTC_1P_20111111T093819_20111111T093847_147313_0191_0025_1E1E/LS05_RKSE_TM__GTC_1P_20111111T093819_20111111T093847_147313_0191_0025_1E1E.BP.PNG'
host='http://eodata.cloudferro.com'

s3=boto3.resource('s3',aws_access_key_id=access_key,
aws_secret_access_key=secret_key, endpoint_url=host,)

bucket=s3.Bucket('eodata')
bucket.download_file(key, '/app/image.png')

time.sleep(300)
On WAW4-1, WAW3-2 and FRA1-2 clouds, the access and secret key pair are defined when the VM is provisioned. See Prerequisite No. 4 where the procedure for obtaining them is explained in detail.
Or, you can always contact Helpdesk and Support and they will obtain the credentials for you.
import boto3
import time

access_key=
secret_key=
key='Landsat-5/TM/L1T/2011/11/11/LS05_RKSE_TM__GTC_1P_20111111T093819_20111111T093847_147313_0191_0025_1E1E/LS05_RKSE_TM__GTC_1P_20111111T093819_20111111T093847_147313_0191_0025_1E1E.BP.PNG'
host='http://eodata.cloudferro.com'

s3=boto3.resource('s3',aws_access_key_id=access_key,
aws_secret_access_key=secret_key, endpoint_url=host,)

bucket=s3.Bucket('eodata')
bucket.download_file(key, '/app/image.png')

time.sleep(300)
requirements.txt
boto3==1.21.41
Dockerfile
# syntax=docker/dockerfile:1
FROM python:3.8-slim-buster

WORKDIR /app
COPY requirements.txt requirements.txt
RUN pip3 install -r requirements.txt
COPY . .
CMD [ "python3", "-m", "app.py"]
Step 3 Build the app’s image and push to DockerHub
To build a Docker image and send it to DockerHub, run the following command from the directory where the files are placed (choose an arbitrary name for your repository):
Note
Depending on your setup, you might need to prefix the Docker commands with sudo.
docker build -t <your-dockerhub-account>/<your-repository-name> .
Ensure that you are logged into your DockerHub:
docker login -u <your-dockerhub-username> -p <your-dockerhub-password>
Then push the image to DockerHub (the repository will get created in DockerHub if it does not exist):
docker push <your-dockerhub-account>/<your-repository-name>
You can verify that the image is pushed by checking in DockerHub web GUI.
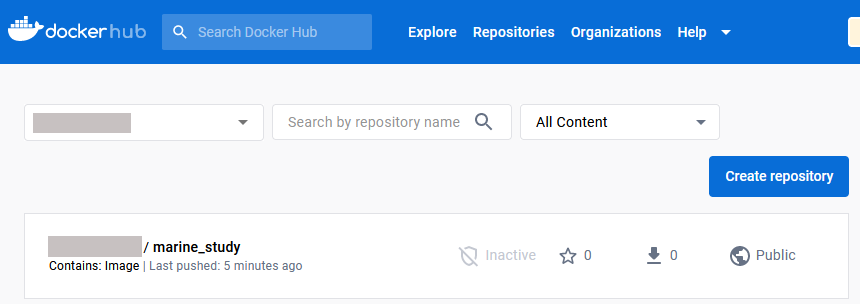
In this image, the repository is already public. If it is private, make it public by clicking on the name of the repository, then on Settings -> Visibility settings.
Step 4 Deploy the application on Kubernetes
You have created and placed image to DockerHub and you can deploy the application as a Kubernetes pod. Usually, you would write a YAML manifest for the pod, but here, for brevity, deploy it using the command line. To do so, type in the following snippet (create an arbitrary pod name):
kubectl run <your-pod-name> --image=<your-dockerhub-account>/<your-repository-name>
Running the command above deploys the pod, which runs your containerized Python application. Since we have 5 minutes before the application terminates (and thus, also the pod), we can check whether the image was downloaded with the following command:
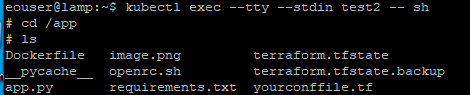
$ kubectl exec --tty --stdin <your-pod-name> -- sh
That will let you enter the shell of the container in the pod. The command line symbol will change from $ to # in the pod. You can verify that the image was downloaded to the pod by navigating to the /app directory and listing the contents.
What To Do Next
Following the guidelines in this article, you can implement more complex scenarios, for instance, by using deployments or jobs instead of pods.
For production scenarios, you might want to place your S3 credentials in a Kubernetes secret or in a secrets registry such as HashiCorp Vault. See Installing HashiCorp Vault on EO-Lab FRA1-1 Magnum.