Private container registries with Harbor on EO-Lab Kubernetes
A fundamental component of the container-based ecosystem are container registries, used for storing and distributing container images. There are a few popular public container registries, which serve this purpose in a software-as-a-service model and the most popular is DockerHub.
In this article, we are using Harbor, which is a popular open-source option for running private registries. It is compliant with OCI (Open Container Initiative), which makes it suitable to work with standard container images. It ships with multiple enterprise-ready features out of the box.
Benefits of using your own private container registry
When you deploy your own private container registry, the benefits would be, amongst others:
full control of the storage of your images and the way of accessing them
privacy for proprietary and private images
customized configuration for logging, authentication etc.
You can also use Role-based access control on Harbor project level to specify and enforce which users have permission to publish updated images, to consume the available ones and so on.
What We Are Going To Cover
Deploy Harbor private registry with Bitnami-Harbor Helm chart
Access Harbor from browser
Associate the A record of your domain to Harbor’s IP address
Create a project in Harbor
Create a Dockerfile for our custom image
Ensure trust from our local Docker instance
Build our image locally
Upload a Docker image to your Harbor instance
Download a Docker image from your Harbor instance
Prerequisites
No. 1 Hosting
You need a EO-Lab hosting account with Horizon interface https://cloud.fra1-1.cloudferro.com/auth/login/?next=/.
No. 2 A cluster on EO-Lab cloud
A Kubernetes cluster on EO-Lab cloud. Follow guidelines in this article How to Create a Kubernetes Cluster Using EO-Lab OpenStack Magnum.
No. 3 kubectl operational
kubectl CLI tool installed and pointing to your cluster via KUBECONFIG environment variable. Article How To Access Kubernetes Cluster Post Deployment Using Kubectl On EO-Lab OpenStack Magnum provides further guidance.
No. 4 Familiarity with deploying Helm charts
See this article:
Deploying Helm Charts on Magnum Kubernetes Clusters on EO-Lab FRA1-1
No. 5 Domain purchased from a registrar
You should own a domain, purchased from any registrar (domain reseller). Obtaining a domain from registrars is not covered in this article.
No. 6 Use DNS service in Horizon to link Harbor service to the domain name
This is optional. Here is the article with detailed information:
DNS as a Service on EO-Lab FRA1-1 Hosting
No. 7 Docker installed on your machine
Deploy Harbor private registry with Bitnami-Harbor Helm chart
The first step to deploy Harbor private registry is to create a dedicated namespace to host Harbor artifacts:
kubectl create ns harbor
Then we add Bitnami repository to Helm:
helm repo add bitnami https://charts.bitnami.com/bitnami
We will then prepare a configuration file, which we can use to control various parameters of our deployment. If you want to have a view of all possible configuration parameters, you can download the default configuration values.yaml:
helm show values bitnami/harbor > values.yaml
You can then see the configuration parameters with
cat values.yaml
Otherwise to proceed with the article, use nano editor to create new file harbor-values.yaml
nano harbor-values.yaml
and paste the following contents:
externalURL: mysampledomain.info
nginx:
  tls:
    commonName: mysampledomain.info
adminPassword: Harbor12345
These settings deploy Harbor portal as a service of LoadBalancer type, and the SSL termination is delegated to NGINX that gets deployed along as a Kubernetes pod.
Warning
We use mysampledomain.info for demonstration purposes only. Please replace this with a real domain you own while running the code in this article.
For demonstration we also use a simple password, which can be replaced after the initial login.
Now install the chart with the following command:
helm install harbor bitnami/harbor --values harbor-values.yaml -n harbor
The output should be similar to the following:
NAME: harbor
LAST DEPLOYED: Tue Aug  1 15:48:44 2023
NAMESPACE: harbor-bitnami
STATUS: deployed
REVISION: 1
TEST SUITE: None
NOTES:
CHART NAME: harbor
CHART VERSION: 16.6.5
APP VERSION: 2.8.1

** Please be patient while the chart is being deployed **

1. Get the Harbor URL:

  NOTE: It may take a few minutes for the LoadBalancer IP to be available.
        Watch the status with: 'kubectl get svc --namespace harbor-bitnami -w harbor'
    export SERVICE_IP=$(kubectl get svc --namespace harbor-bitnami harbor --template "{{ range (index .status.loadBalancer.ingress 0) }}{{ . }}{{ end }}")
    echo "Harbor URL: http://$SERVICE_IP/"

2. Login with the following credentials to see your Harbor application

  echo Username: "admin"
  echo Password: $(kubectl get secret --namespace harbor-bitnami harbor-core-envvars -o jsonpath="{.data.HARBOR_ADMIN_PASSWORD}" | base64 -d)
Access Harbor from browser
With the previous steps followed, you should be able to access the Harbor portal. The following command will display all of the services deployed:
kubectl get services -n harbor
Here they are:
$ kubectl get services -n harbor-bitnami
NAME                    TYPE           CLUSTER-IP       EXTERNAL-IP      PORT(S)                                     AGE
harbor                  LoadBalancer   10.254.208.73    64.225.133.148   80:32417/TCP,443:31448/TCP,4443:31407/TCP   4h2m
harbor-chartmuseum      ClusterIP      10.254.11.204    <none>           80/TCP                                      4h2m
harbor-core             ClusterIP      10.254.209.231   <none>           80/TCP                                      4h2m
harbor-jobservice       ClusterIP      10.254.228.203   <none>           80/TCP                                      4h2m
harbor-notary-server    ClusterIP      10.254.189.61    <none>           4443/TCP                                    4h2m
harbor-notary-signer    ClusterIP      10.254.81.205    <none>           7899/TCP                                    4h2m
harbor-portal           ClusterIP      10.254.217.77    <none>           80/TCP                                      4h2m
harbor-postgresql       ClusterIP      10.254.254.0     <none>           5432/TCP                                    4h2m
harbor-postgresql-hl    ClusterIP      None             <none>           5432/TCP                                    4h2m
harbor-redis-headless   ClusterIP      None             <none>           6379/TCP                                    4h2m
harbor-redis-master     ClusterIP      10.254.137.87    <none>           6379/TCP                                    4h2m
harbor-registry         ClusterIP      10.254.2.234     <none>           5000/TCP,8080/TCP                           4h2m
harbor-trivy            ClusterIP      10.254.249.99    <none>           8080/TCP                                    4h2m
Explaining the purpose of several artifacts is beyond the scope of this article. The key service that is interesting to us at this stage is harbor, which got deployed as LoadBalancer type with public IP 64.225.134.148.
Associate the A record of your domain to Harbor’s IP address
The final step is to associate the A record of your domain to the Harbor’s IP address.
- Create or edit the A record through your domain registrar
The exact steps will vary from one registrar to another so explaining them is out of scope of this article.
- Create or edit the A record through the DNS as a service available in your EO-Lab account
This is explained in Prerequisite No. 6. Use commands DNS –> Zones and select the name of the site you are using instead of mysampledomain.info, then click on Record Sets. In column Type, there will be type A - Address record and click on Update field on the right side to enter or change the value in that row:
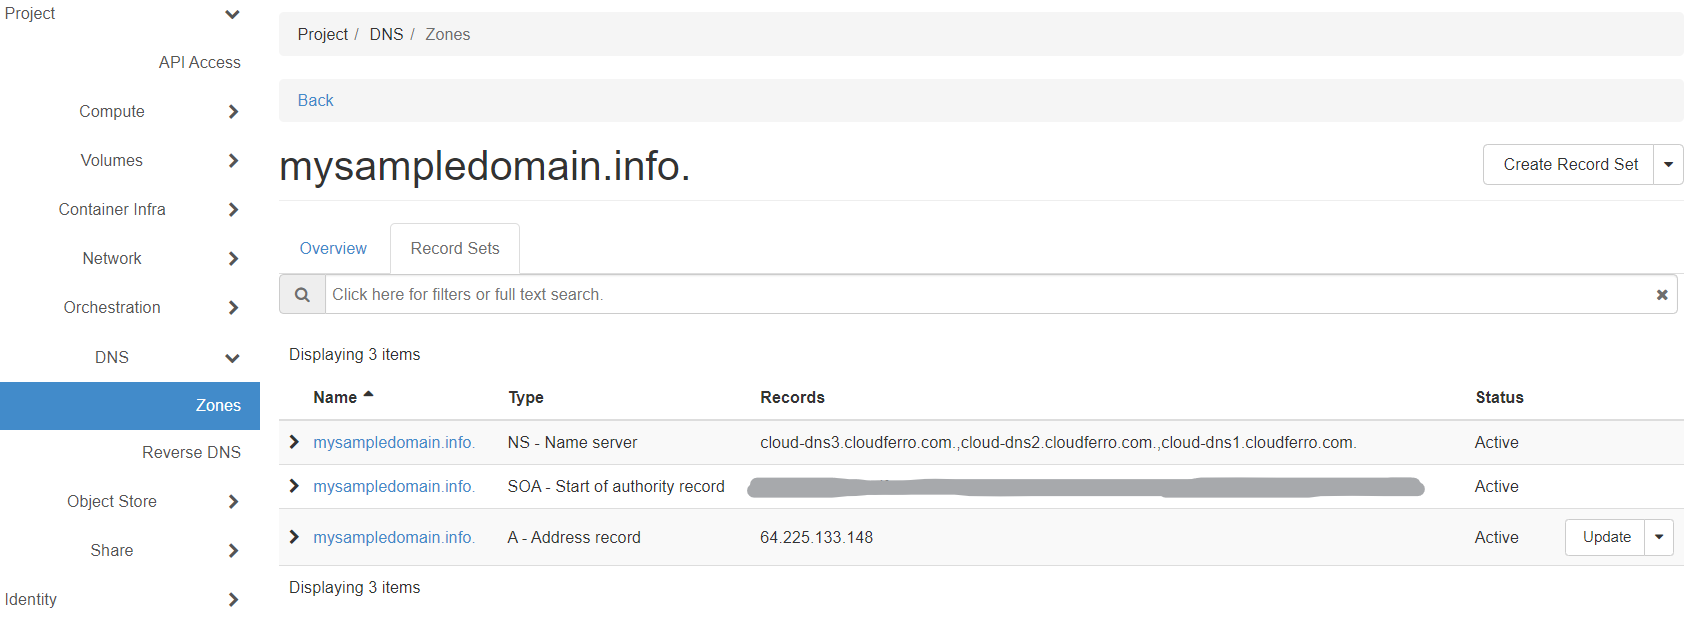
In this screenshot, the value 64.225.134.148 is already entered into that Update field – you will, of course, here supply your own IP value instead.
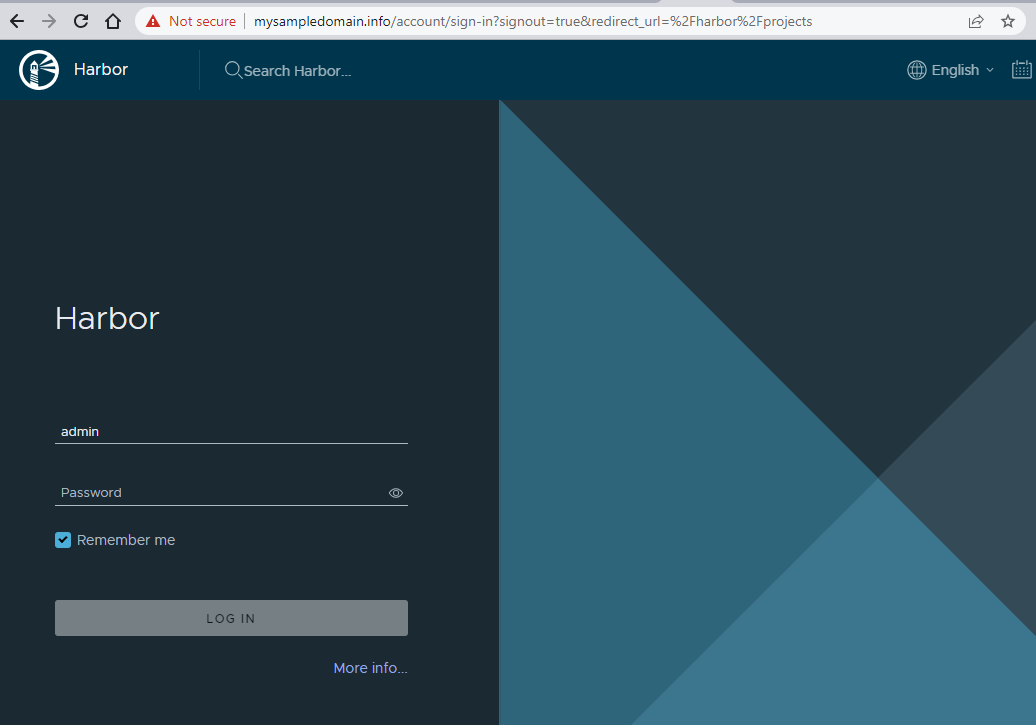
With the above steps completed, you can access harbor from the expected URL, in our case: https://mysampledomain.info. Since the chart generated self-signed certificates, you will first need to accept the “Not Secure” warning provided by the browser:
Note
This warning will vary from one browser to another.
To log in to your instance, use these as the login details
login
admin
password
Harbor12345
Create a project in Harbor
When you log in to Harbor, you enter the Projects section:
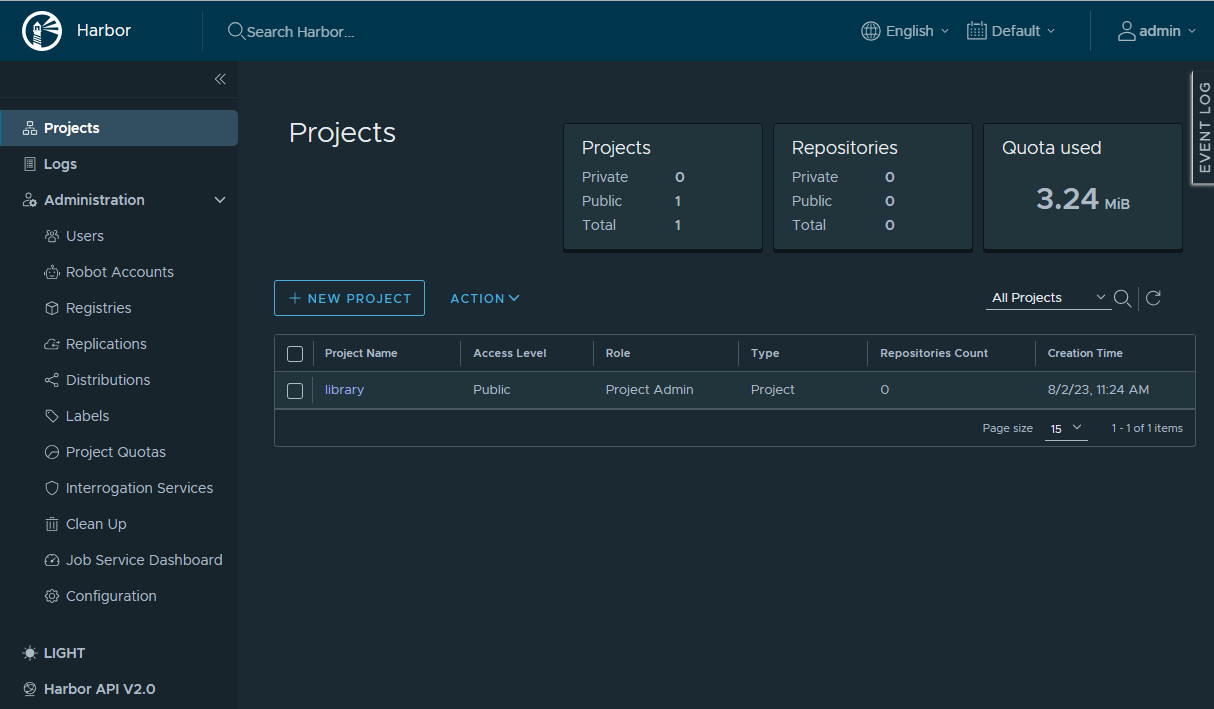
A project in Harbor is a separate space where containers can be placed. An image needs to be placed in a scope of a specific project. As a Harbor admin, you can also apply Role-Based Access Control on the Harbor project level, so that only specific users can access or perform certain operations within a scope of a given project.
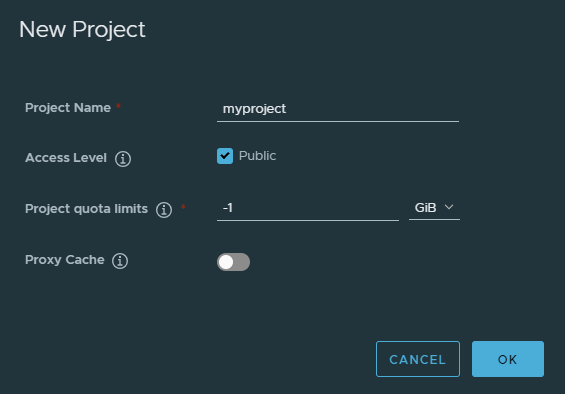
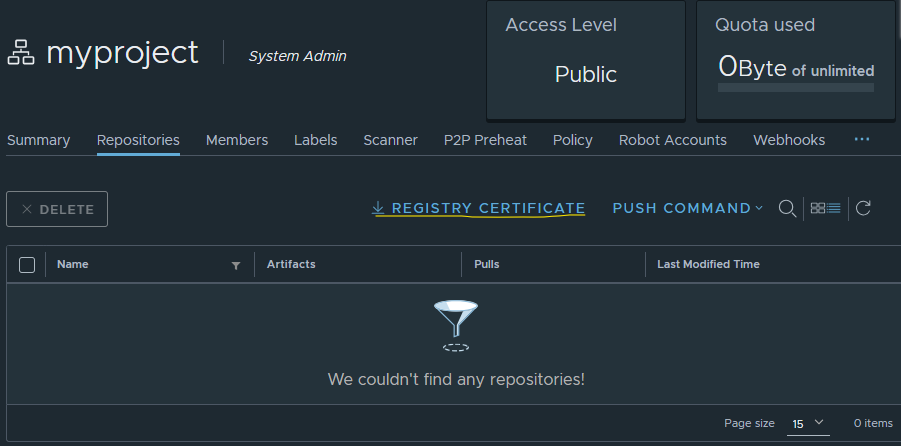
To create a new project, click on New Project button. In this article, we will upload a public image that can be accessed by anyone, and let it be called simply myproject:
Create a Dockerfile for our custom image
The Harbor service is running and we can use it to upload our Docker images. We will generate a minimal image, so just create an empty folder, called helloharbor, with a single Docker file (called Dockerfile)
Dockerfile
mkdir helloharbor
cd helloharbor
nano Dockerfile
and its contents be:
FROM alpine
CMD ["/bin/sh", "-c", "echo 'Hello Harbor!'"]
Ensure trust from our local Docker instance
In order to build our Docker image in further steps and upload this image to Harbor, we need to ensure communication of our local Docker instance with Harbor. To fulfill this objective, proceed as follows:
Ensure Docker trust - Step 1. Bypass Docker validating the domain certificate
Bypass Docker validating the domain certificate pointing to the domain where Harbor is running. Docker would not trust this certificate, because it is self-signed. To bypass this validation, create a file called daemon.json in /etc/docker directory on your local machine:
sudo chmod 777 /etc/docker
You are using sudo so will be asked to supply the password. Now create the file:
nano /etc/docker/daemon.json
and fill in with this content, then save with Ctrl-X, Y:
{
    "insecure-registries" : [ "mysampledomain.info" ]
}
As always, replace mysampledomain.info with your own domain.
For production, you would rather set up proper HTTPS certificate for the domain.
Ensure Docker trust - Step 2. Ensure Docker trusts the Harbor’s Certificate Authority
To do so, we download the ca.crt file from our Harbor portal instance from the myproject project view:
The exact way of installing the certificate will depend on the environment you are running Docker on:
- Install the certificate on Linux
Create a nested directory path /etc/docker/certs.d/mysampledomain.info and to this folder upload the ca.crt file:
sudo mkdir -p /etc/docker/certs.d/mysampledomain.info
sudo cp ~/ca.crt /etc/docker/certs.d/mysampledomain.info
- Install the certificate on WSL2 running on Windows 10 or 11
In WSL2, you would need to upload the certificate to Windows ROOT CA store with the following sequence:
Click on Start and type Manage Computer Certificates
Right-click on Trusted Root Certification Authorities then All tasks and Import
Browse to the ca.crt file location and then keep pressing Next to complete the wizard
Restart Docker from Docker Desktop menu
Ensure Docker trust - Step 3. Restart Docker
Restart Docker with:
sudo systemctl restart docker
Build our image locally
After these steps, we can tag our image and build it locally (from the location where Dockerfile is placed):
docker build -t mysampledomain.info/myproject/helloharbor .
Next we can log in to the Harbor portal with our admin login and Harbor12345 password:
docker login mysampledomain.info
Upload a Docker image to your Harbor instance
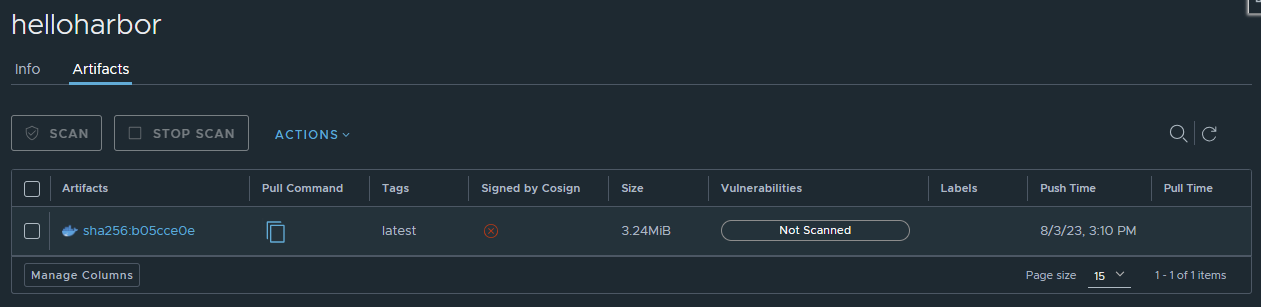
Lastly, push the image to the repo:
docker push mysampledomain.info/myproject/helloharbor
The result will be similar to the following:
Download a Docker image from your Harbor instance
To demonstrate downloading images from our Harbor repository, we can first delete the local Docker image we created earlier.
docker image rm mysampledomain.info/myproject/helloharbor
To verify, view it is not on our local images list:
docker images
Then pull from Harbor remote:
docker pull mysampledomain.info/myproject/helloharbor