Kubernetes Persistent Volume Claims on EO-Lab
In Kubernetes, Persistent Volumes (PV) and Persistent Volume Claims (PVC) are selected mechanisms to jointly serve the purpose of providing storage persistence, beyond the lifecycle of containers and pods.
On EO-Lab platform, as part of the OpenStack Magnum project, such persistence is implemented using OpenStack Cinder CSI driver. In this article, we shall show an example of persistent volumes and persistent volume claims. Once you define a claim, you will be able to use it in several places within your Kubernetes application.
What We Are Going To Cover
Verify presence of Cinder CSI driver on your Kubernetes cluster
Create persistent volume claims dynamically – via a yaml file
Store data to the persistent volume
Delete the pod and recreate it again (accessing it via SSH)
Verify that the data persists after pod deletion
Prerequisites
1 Hosting
You need a EO-Lab hosting account with Horizon interface https://cloud.fra1-1.cloudferro.com/auth/login/?next=/.
2 Creating clusters with CLI
The article How To Use Command Line Interface for Kubernetes Clusters On EO-Lab OpenStack Magnum will introduce you to creation of clusters using a command line interface.
3 Connect openstack client to the cloud
Prepare openstack and magnum clients by executing Step 2 Connect OpenStack and Magnum Clients to Horizon Cloud from article How To Install OpenStack and Magnum Clients for Command Line Interface to EO-Lab Horizon.
4 Understanding Persistent Volumes and Persistent Volume Claims
This is a formal introduction to Persistent Volumes and Persistent Volume Claims on main Kubernetes site.
5 Further reading on OpenStack Cinder CSI
A rather technical introduction to OpenStack Cinder CSI plugin from official Kubernetes repository on GitHub.
For alternative scenarios requiring multi-node reads/writes, there are alternative solutions that can also be integrated into a Magnum Kubernetes cluster, for instance, S3 object storage or database persistence.
Types of Cinder CSI Persistence
Cinder CSI is backed by Openstack Cinder block storage volumes, that get created as a storage resource for the Kubernetes cluster.
In Kubernetes, there are three main modes of accessing persistent storage:
readwriteonce (RWO)
readonlymany (ROX)
readwritemany (RWX)
Cinder CSI implementation on FRA1-1 cloud supports the RWO type of persistence. This means that a Persistent Volume available via a Persistent Volume Claim is available for read and write access from a single node.
Inspect Cinder CSI Driver on Your Kubernetes Cluster
The Cinder CSI driver comes preinstalled on a newly created Kubernetes cluster. To view more details type either of the commands:
kubectl get csidrivers.storage.k8s.io
kubectl describe csidrivers.storage.k8s.io
The CSI plugin is deployed as several pods running on master and worker nodes. We can view details of one of these pods using command like this:
kubectl describe pod csi-cinder-controllerplugin-0 -n kube-system
The output of these commands may be hundreds of lines long so showing them is out of scope of this article.
Creating Persistent Volume Claims Dynamically
Storage Class is an abstraction that enables dynamic creation of persistent volumes. We can define a storage class once and reuse it later for creating other persistent volume claims of the same type. On FRA1-1 cloud we have 2 storage classes created by default on a new cluster. To verify this execute a following kubectl command:
kubectl get sc
The 2 storage classes are listed, the default one for SSD storage (cinder-ssd), and the second one for HDD (cinder-hdd):
(openstack_cli) eouser@LAPTOP-63SMP31T:~$ kubectl get sc
NAME                   PROVISIONER                RECLAIMPOLICY   VOLUMEBINDINGMODE   ALLOWVOLUMEEXPANSION   AGE
cinder-hdd             cinder.csi.openstack.org   Delete          Immediate           true                   4d17h
cinder-ssd (default)   cinder.csi.openstack.org   Delete          Immediate           true                   4d17h
To create new Persistent Volume claim, using the cinder-ssd storage class, save the following file as dynamic-storage.yaml.
apiVersion: v1
kind: PersistentVolumeClaim
metadata:
  name: my-pvc
spec:
  accessModes:
  - ReadWriteOnce
  resources:
    requests:
      storage: 1Gi
  storageClassName: cinder-ssd
After executing this yaml file via:
kubectl apply -f dynamic-storage.yaml
we can check that the persistent volume claim were created. Similarly, under the hood, the Persistent Volume was created as well. View these artifacts with the following commands:
kubectl get pv
kubectl get pvc
(openstack_cli) eouser@LAPTOP-63SMP31T:~$ kubectl get pvc
NAME     STATUS   VOLUME                                     CAPACITY   ACCESS MODES   STORAGECLASS   AGE
my-pvc   Bound    pvc-0299b433-6b9c-48cb-8106-05cffae73612   1Gi        RWO            cinder-ssd     12s
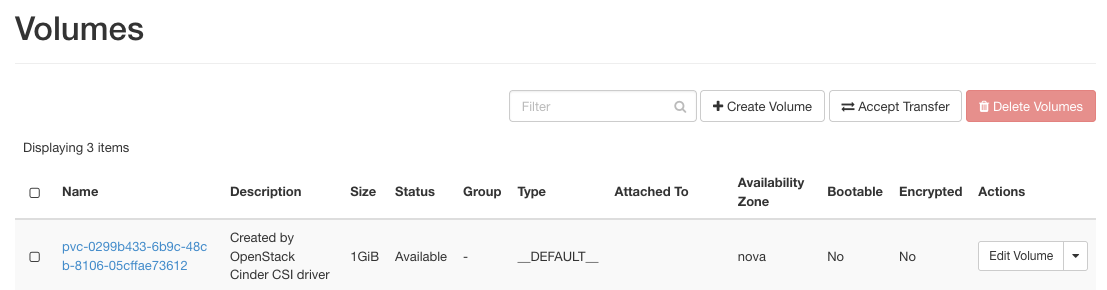
Also, verifying the OpenStack Horizon console, we can see that an actual volume block storage was created.
Storing Data to the Mounted Persistent Volume
We will run an nginx pod, based on an official image, to which we mount our my-pvc volume claim.
Save the following file as check.yaml.
apiVersion: v1
kind: Pod
metadata:
  name: mypod
spec:
  containers:
    - name: check
      image: nginx
      volumeMounts:
      - mountPath: "/var/www/html"
        name: check
  volumes:
    - name: check
      persistentVolumeClaim:
        claimName: my-pvc
Running this yaml file with:
kubectl apply -f check.yaml
we create a pod, with the persistent volume mounted to folder /var/www/html. We can access the pod with this command:
kubectl exec --tty --stdin mypod -- "/bin/bash"
As a verfication step let’s create a file in the folder, which is mounted to the volume /var/www/html:
touch /var/www/html/example-file.txt
Verify That the Data Persists After pod Deletion
After running the previous steps, the example-file.txt is saved on the persistent volume. Even if the pod (or even the node, on which this pod is created) were deleted, this file should persist.
Let’s verify this, by
deleting the pod,
recreating it again,
accessing it via SSH and
checking the contents of /var/www/html folder:
kubectl delete pod mypod
kubectl apply -f check.yaml
kubectl exec --tty --stdin mypod -- "/bin/bash"
cd /var/www/html
ls -l
We should see that the file example-file.txt is persistent, that is, still available in the mounted folder.
