How to Activate OpenStack CLI Access to EO-Lab Cloud Using One- or Two-Factor Authentication
This guide shows how to enable OpenStack CLI access to the EO-Lab cloud using either one-factor (password-only) or two-factor authentication (2FA). You will learn how to install the required tools, download and activate the appropriate RC file, and verify your setup with a test command.
What We Are Going to Cover
Quick Start (Summary)
The following high-level steps outline the complete procedure:
Install OpenStackClient and jq
Download the appropriate RC file from Horizon
Activate the file in a terminal using source
Enter your password (and 2FA code, if applicable)
Run openstack flavor list to verify access
Each of these steps is explained in detail in the sections below.
Understanding One- and Two-Factor Authentication
To use the OpenStack CLI, your computer must authenticate to the cloud. Most often, this is done using a username and password — this is known as one-factor authentication.
Two-factor authentication adds an extra layer of security. In this case, you enter not only your password but also a temporary code generated by a device or software application (such as FreeOTP or KeePassXC).
The authentication parameters are passed to the CLI through a script file known as the RC file. This file configures your session with the necessary credentials.
Prerequisites
Before you can begin using the CLI, make sure you meet the following requirements.
No. 1 Account
You need a valid EO-Lab cloud account and access to the Horizon dashboard: https://cloud.fra1-1.cloudferro.com/auth/login/?next=/.
No. 2 Two-Factor Authentication (2FA)
If your account is protected by 2FA, you will need to install an authenticator app. This app will generate the six-digit code required for login each time you authenticate.
For mobile devices: Two-Factor Authentication on the EO-Lab Site Using a Mobile Application
For desktop users: Two-Factor Authentication to EO-Lab site using KeePassXC on desktop
No. 3 OpenStackClient Installed
To run CLI commands, you must install the OpenStackClient. This also enables you to execute .sh files, including the RC file.
Follow the installation guide for your platform:
Windows (GitBash): How to install OpenStackClient GitBash for Windows on EO-Lab
Windows (WSL): How to install OpenStackClient on Windows using Windows Subsystem for Linux on EO-Lab OpenStack Hosting
No. 4 jq Installed
If your account uses 2FA, the RC file will use the jq utility to process authentication tokens in JSON format.
To install jq on Ubuntu:
sudo apt update
sudo apt install jq
Verify the installation:
jq --version
You should see something like jq-1.6.
Downloading the RC File
The RC file contains all the environment variables needed for CLI-based authentication.
To download it, log in to Horizon and look for your account name in the top-right corner.
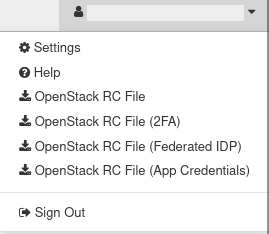
Click on API Access to reach the download section:
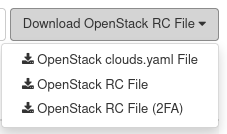
You will see several download options.
Choosing the Correct RC File
Depending on your account type, download the appropriate file:
If your account uses 2FA: download OpenStack RC File (2FA)
If not: download OpenStack RC File
Once the RC file is downloaded, rename and move it to a working directory for easier access. For example:
mv cloud_00734_1-openrc-2fa.sh openrc.sh
What’s Inside the RC File
The RC file is a script that sets temporary environment variables like OS_USERNAME, OS_PASSWORD, and optionally, 2FA-related keys.
Here’s what a typical RC file looks like:
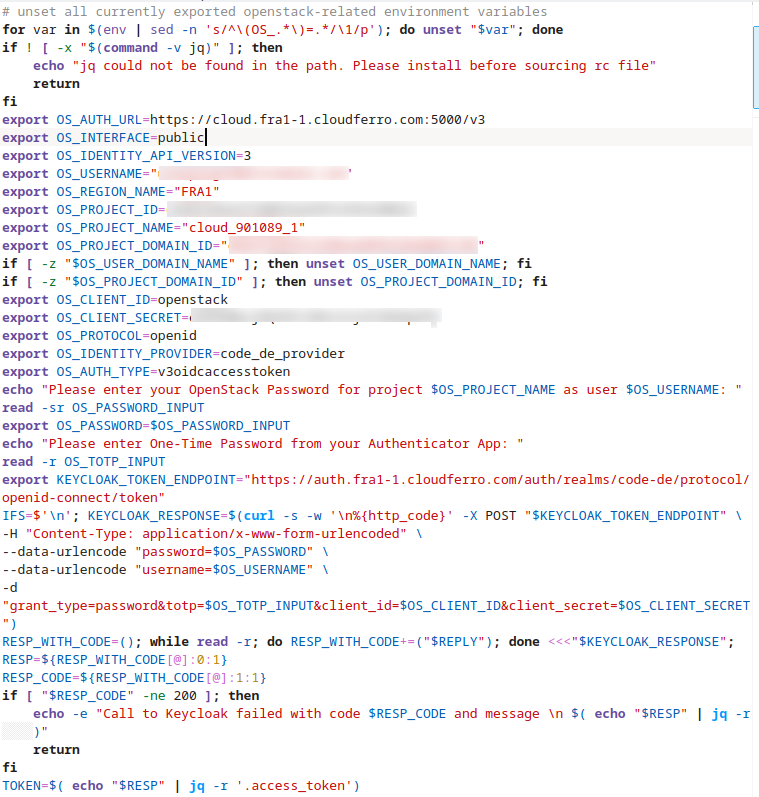
The file configures your session to authenticate with the cloud automatically, using these variables.
Activating the RC File
In this step, you’ll run the RC file so that your shell environment is updated with the credentials it contains.
Ubuntu/macOS
Use the source command to load the environment variables:
source ./openrc.sh
Tip
./ refers to the current directory. Run this from the same folder where the file is located.
After running this command, your terminal will prompt you to enter your password. If your account is protected by 2FA, you will also be prompted for the one-time code.
Windows
You can also run the RC file under Windows, but you’ll need GitBash or WSL to execute .sh scripts. Refer back to the OpenStackClient installation section if you haven’t set this up yet.
Using the RC File with One-Factor Authentication
If your account does not use 2FA, the terminal will prompt only for your password.

After you enter your password, you’ll be authenticated and ready to run OpenStack CLI commands.
Using the RC File with Two-Factor Authentication
If your account uses 2FA, you’ll be prompted for both your password and a six-digit TOTP code.

Open your authenticator app and select the account tied to your cloud login:
You’ll see a six-digit code, which is refreshed every 30 seconds:
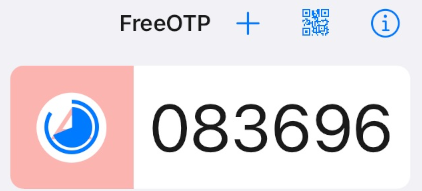
Enter the code at the prompt. If all credentials are correct, the prompt will return silently, and you can begin issuing OpenStack commands.
Warning
These codes expire quickly — always use the most recently displayed value.
Environment Variable Lifetime
Keep in mind that the environment variables set by the RC file only apply to the current terminal session.
To demonstrate this, open two terminal windows: activate the RC file in one, then try to run an OpenStack command in the other. It will fail unless you also activate the RC file there.
You’ll need to source the file every time you open a new terminal window.
Testing CLI Access
To verify that authentication worked correctly, run the following command:
openstack flavor list
You should receive a list of available flavors from the cloud:
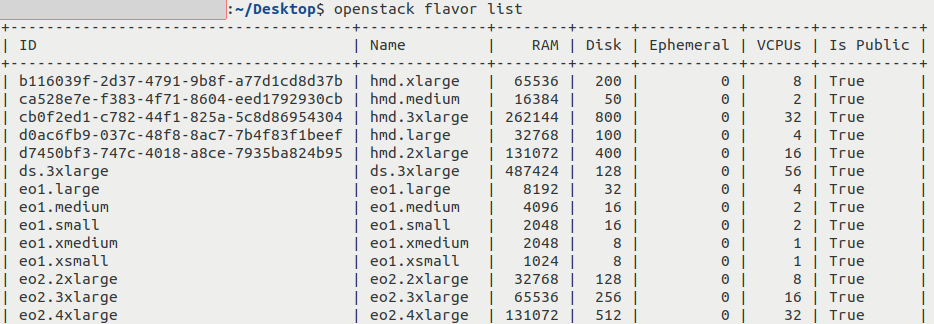
If this command succeeds, your OpenStack CLI access is fully configured.
Troubleshooting
jq not installed

Install jq using your package manager or download it from https://jqlang.github.io/jq/download/.
Wrong 2FA Code or Password
Call to Keycloak failed with code 401 and message
{
  "error": "invalid_grant",
  "error_description": "Invalid user credentials"
}
Simply re-run the RC file and re-enter your credentials.
No Internet Connection
If the RC file fails to authenticate and shows this message:
Call to Keycloak failed with code 000 and message
Ensure your device is connected to the Internet, then try again.
Wrong RC File for 2FA Account
Unrecognized schema in response body. (HTTP 401)
This likely means you downloaded the non-2FA version. Replace it with the correct RC file for your account type.
What To Do Next
With your CLI access enabled, you can now manage your cloud environment programmatically.
To create a virtual machine:
How to create a VM using the OpenStack CLI client on EO-Lab cloud
To upload a custom image:
How to upload your custom image using OpenStack CLI on EO-Lab