Prepare the operating system before detaching a volume
Before you detach a data volume from a virtual machine, make sure that the guest operating system is no longer using it. This prevents file corruption, incomplete writes, and mount errors when the volume is attached to another VM.
This article explains what to do inside a Linux or Windows VM before detaching an additional data volume in OpenStack.
Important
Do not use this procedure for the system volume of a VM. This procedure is intended only for additional data volumes attached to the VM.
Prerequisites
Before you start, make sure that you have:
Access to the EO-Lab hosting account and project where the VM and the volume are located https://tenant-manager.eo-lab.org/login.
A running Linux or Windows virtual machine with an additional data volume attached.
Access to the guest operating system inside the VM.
For Linux VMs, you can connect over SSH or use the OpenStack console:
How to connect to your virtual machine via SSH in Linux on EO-Lab
How to connect to a virtual machine via SSH from Windows 10 Command Prompt on EO-Lab
For Windows VMs, use the OpenStack console or Remote Desktop, depending on how the VM is configured.
Administrative privileges inside the guest operating system:
sudo privileges on Linux,
Administrator privileges on Windows.
A clear way to identify the data volume that you want to detach. For example, check its size, device name, mount point, drive letter, or volume name before you detach it.
Linux
Connect to your Linux virtual machine, for example over SSH or through the OpenStack console.
Before unmounting the volume, make sure that no applications are using files stored on it. Also check that no open terminal session has a directory on that volume as its current working directory.
Use the following command to list block devices, partitions, and mount points:
lsblk
You should get output similar to this:
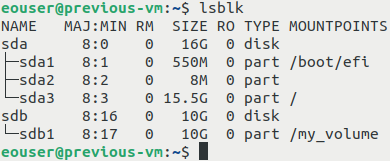
In this example, the volume is mounted at /my_volume. If your volume uses a different mount point, use that path in the following commands.
Unmount the volume:
sudo umount /my_volume
If the command finishes successfully, it does not return any output.
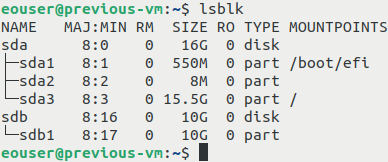
Run lsblk again to verify that the volume is no longer mounted:
lsblk
The volume should no longer have a value in the MOUNTPOINTS column.
If the volume has more than one mounted partition, unmount each mounted partition before continuing.
If the unmount command reports that the target is busy, some process is still using the volume. You can check which processes are using the mount point with:
sudo lsof +f -- /my_volume
or:
sudo fuser -vm /my_volume
Close the listed applications or terminal sessions, then try to unmount the volume again.
If the volume is mounted automatically through /etc/fstab, remove or comment out the corresponding line before detaching the volume. Otherwise, the system may try to mount the missing disk again during the next boot.
Open /etc/fstab with a text editor, for example:
sudo nano /etc/fstab
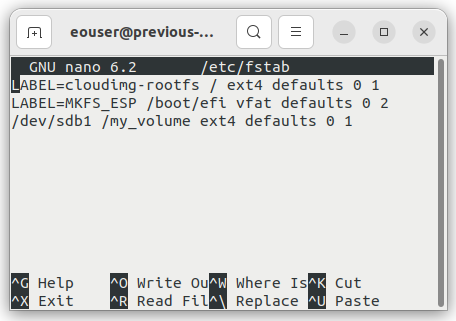
Find the line responsible for mounting the volume. You can either remove it or comment it out by placing the # character at the beginning of the line.
For example:
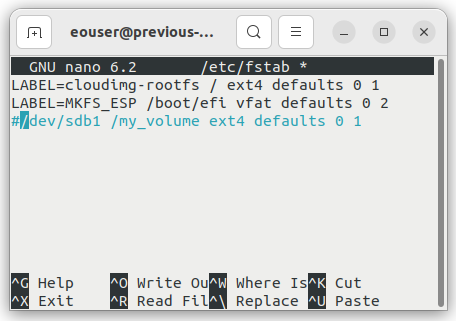
Make sure that you do not modify other lines unless you intend to, especially lines responsible for system partitions.
If the volume is mounted by another mechanism, such as a systemd .mount unit, disable that configuration as well before detaching the volume.
After the volume is unmounted and automatic mounting is disabled, shut down the virtual machine:
sudo shutdown now
After the VM is powered off, you can detach the volume from the VM in OpenStack.
Windows
Connect to the Windows virtual machine.
Before disconnecting a data volume, close all applications that may be using files on that disk. This includes File Explorer windows, terminals, database services, web servers, backup tools, and any application that may write to the volume.
Open Disk Management:
Right-click the Start button.
Select Disk Management.
Locate the disk that corresponds to the attached data volume.
Make sure you identify the correct disk. Do not select the system disk that contains the Windows installation.
If the volume has a drive letter, such as D: or E:, confirm that no files are open from that drive.
To prepare the disk for detachment, take the disk offline:
In Disk Management, find the disk label on the left side, for example Disk 1.
Right-click the disk label.
Select Offline.
The disk should now appear as Offline in Disk Management. This means that Windows is no longer actively using it.
After the disk is offline, shut down the Windows VM from the operating system.
When the VM is powered off, you can detach the volume from the VM in OpenStack.
What to do next
After the guest operating system has released the volume and the VM is powered off, detach the volume from the VM in OpenStack.
Depending on your goal, continue with one of the following procedures:
How to move data volume between two VMs using OpenStack Horizon on EO-Lab
/networking/How-to-create-backup-of-your-volume-from-Windows-machine-on-EO-Lab